Skip to content
Picture of ApniPathshala Logo Primary
  • Start A Pod
  • Pods
  • Apna PC
  • What We Do
    • Stories
    • Comics
    • Courses
  • Blogs
  • Start A Pod
  • Pods
  • Apna PC
  • What We Do
    • Stories
    • Comics
    • Courses
  • Blogs
What’s new
View all updates
Picture of ApniPathshala Logo Primary
What’s new
View all updates

Search

cancel

Notifications

  • Collaboration with NCSM
  • Read, How a small POD is changing lives
  • Read, Pros and Cons of Homeschooling
  • Read, Microschooling a new way to learn

Suggestions

Non - Profit PODs
Apna PC
POD Manual
How to start a POD?
What is a POD?
Mumbai
Delhi
What is a Microschool?
Instagram
Apply to open a POD

Follow Us:

Facebook X-twitter Youtube Instagram Phone-alt Envelope

Need Help?

  • How to Apply for a POD
  • What is Apni Pathshala?
  • Understanding the Incubation Phase
  • Weekly Responsibilities During Incubation
  • Monthly Responsibilities During Incubation
Picture of ApniPathshala Logo Primary
cancel
  • Home
  • Start A Pod
  • Pods
  • Apna PC
  • Blog
  • Comics
  • Courses
  • Dr. Malpani’s Insights
  • Student Stories
  • About Us
  • Contact Us
  • Home
  • Start A Pod
  • Pods
  • Apna PC
  • Blog
  • Comics
  • Courses
  • Dr. Malpani’s Insights
  • Student Stories
  • About Us
  • Contact Us
Facebook X-twitter Youtube Instagram Phone-alt Icon-email1

POD Operating Manual

Getting Started

2
  • How to Apply for a POD
  • What is Apni Pathshala?

POD Operations for POD Leaders

21
  • Configure Innovative Teaching Methods in Apni Pathshala PMS
  • Submit Student Success Stories Using Apni Pathshala PMS
  • How to upload weekly report on PMS
  • Skill Development Cluster
  •  Employment Cluster – Definition Structure
  • Digital Literacy Cluster – Definition Structure
  • Academic Empowerment Cluster Definition Structure
  • One-Year POD Standard (Aligned to AP Phases 0–3)  
  • Post-KYC Meeting with the POD
  • SOP: Software Testing Before POD Launch
  • SOP for New POD Applications (Complete, Priority-Arranged)
  • Curriculum Assessment & Design for PODs
  • Shipment, Delivery & PC Setup Guide
  • How to Raise a Hardware Complaint
  • Red Flags and Corrective Actions
  • Usefull Tools and Templates
  • Final Evaluation of Incubation
  • Core Evaluation Criteria
  • Monthly Responsibilities During Incubation
  • Understanding the Incubation Phase
  • Weekly Responsibilities During Incubation

ApniPrerna

5
  • Deleting Old or Unused User Accounts
  • Deleting Unwanted Applications
  • How to Create Student Login Credentials in Apni Prerna
  • How to Install Apni Prerna Software on a Windows PC
  • SOP: Installation of Apni Prerna on Linux PCs 
View Categories

How to Create Student Login Credentials in Apni Prerna

1. Purpose

This SOP explains the step-by-step process for a POD Leader to create a new student account in the Apni Prerna Student Safety System so that the student can receive login credentials and access the platform.

2. Who Should Use This SOP

This SOP is for:

  • POD Leaders
  • Authorized center admins who are responsible for creating student accounts

3. System Used

  • Platform Name: Apni Prerna
  • Module Used: Students
  • Purpose: Create student profile and generate login credentials

4. Before You Start

Before creating a student account, keep the following details ready:

  • Student first name
  • Student last name
  • Learning Center name
  • Standard/Class
  • Student age 
  • Student email ID (Optional, but recommended)
  • Parent contact number (optional but useful)

Important:
If the student’s email is added correctly, the student can receive account-related details on Gmail.


Step-by-Step Process

Step 1: Log in to Apni Prerna

  1. Open the Apni Prerna login page.
  2. Enter your registered email address.
  3. Enter your password.
  4. Click on Sign in.

Outcome:
You will enter the Apni Prerna dashboard.


Step 2: Open the Students Section

  1. From the left-side menu, click on Students.
  2. This will open the Student accounts page.
  3. Here, you can view all previously created students.

Outcome:
You will see the student list and the Add Student button on the top-right side.

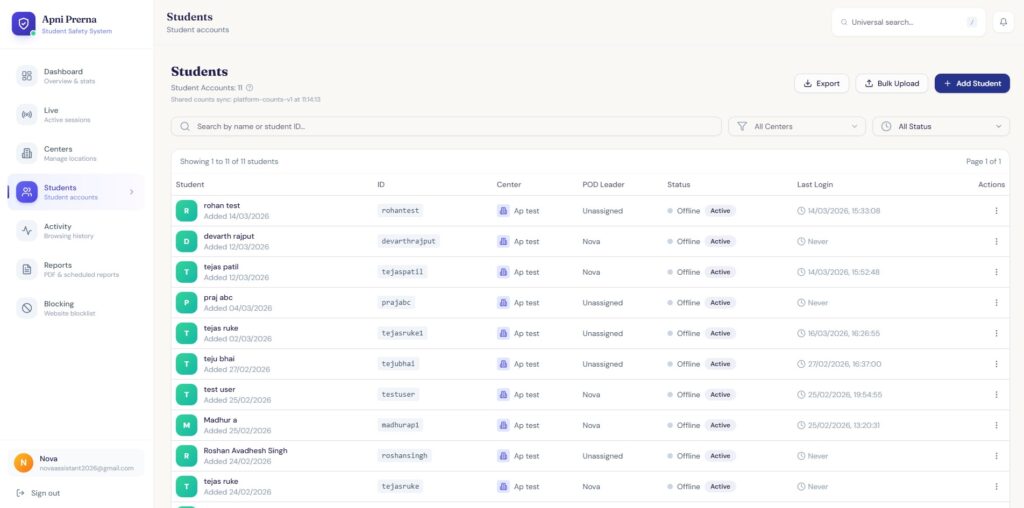
Step 3:Choose How You Want to Add Students

You have two options:

  • Add Student → To add an individual student
  • Bulk Upload → To add multiple students at once

Option A: Add Individual Student

Step 4: Click on “Add Student”

  • Click the Add Student button
  • A popup form titled Add New Student will open

Step 5: Fill in Student Details

Required Fields:

  • First Name
  • Last Name
  • Standard
  • Age
  • Email
  • Parent Contact

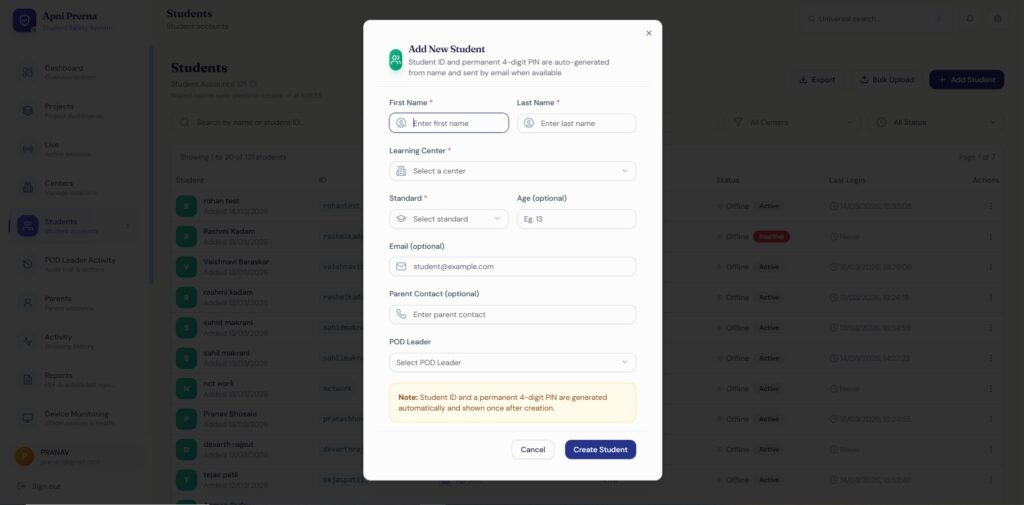
Step 6: Verify All Details Carefully

Check:

  • Name spelling is correct
  • Correct learning center is selected
  • Correct class is selected
  • Email ID is correct
  • Parent contact is correct

Why this matters:
Incorrect email = credentials may not be received.


Step 7: Create the Student Account

  • Click on Create Student
  • Wait for processing

Outcome:
Student account is created.


Step 8: Check Gmail for Credentials

  • Open Gmail
  • Check for email
  • Look for login details

Important:
Student ID and PIN/password are shared via email.


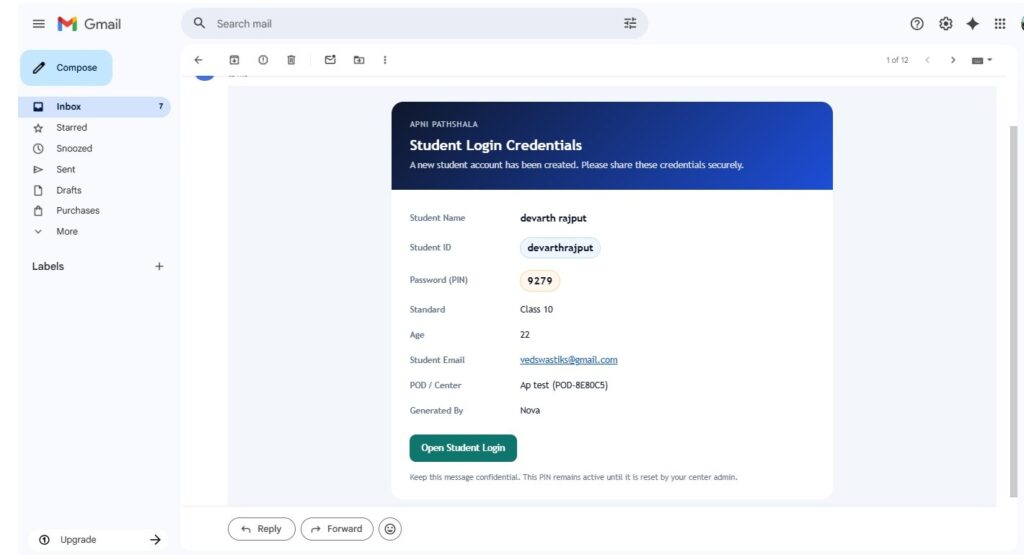
Step 9: Share Credentials with Student

  • Share Student ID
  • Share PIN/Password
  • Instruct student to keep it safe

Step 10: Confirm Account Creation

Go back to Students page and verify:

  • Student appears in list
  • Student ID is visible
  • Status shows Active

Option B: Bulk Upload (Multiple Students)

Step 4A: Click on “Bulk Upload”

  • On the Students page, click Bulk Upload

Outcome:
Bulk upload interface opens.


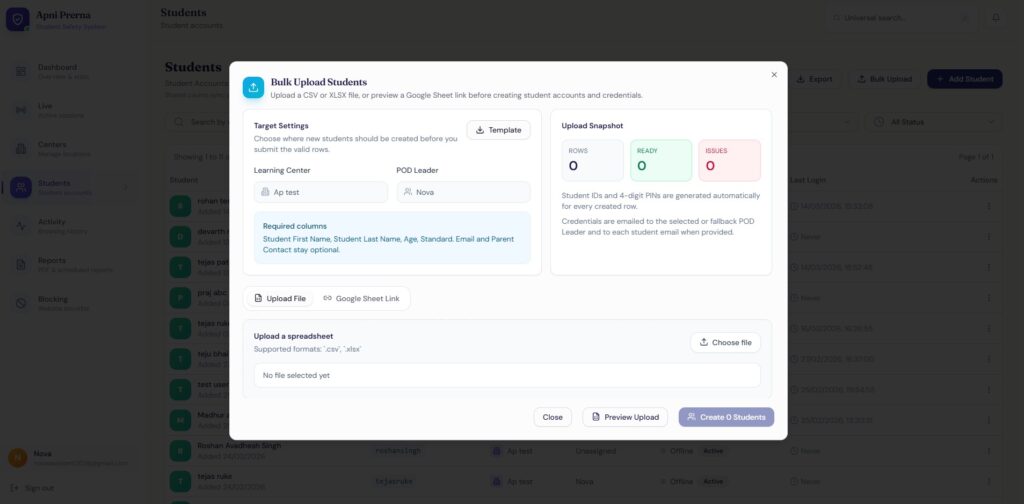
Step 4B: Prepare the Upload File

  • Download template 

Required Columns:

  • First Name
  • Last Name
  • Learning Center
    Standard
  • Age
  • Email
  • Parent Contact

Important:
Follow the correct format and column names.

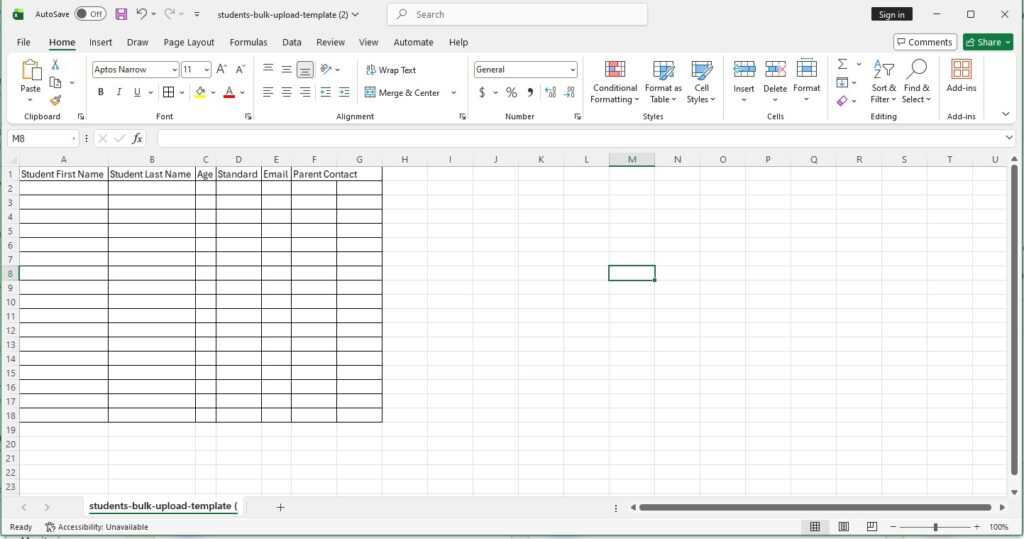
Step 4C: Fill the Bulk Upload Template

After downloading the template, fill it in as follows:

Column-wise Instructions:

  • Student First Name → Enter the student’s first name
  • Student Last Name → Enter the student’s last name
  • Age → Enter the student’s age
  • Standard → Enter the student’s class/standard (e.g., 7, 8, 9)
  • Email → Enter the student’s Gmail ID (recommended for receiving login credentials)
  • Parent Contact → Enter a valid 10-digit mobile number

After entering all student details:Save the File


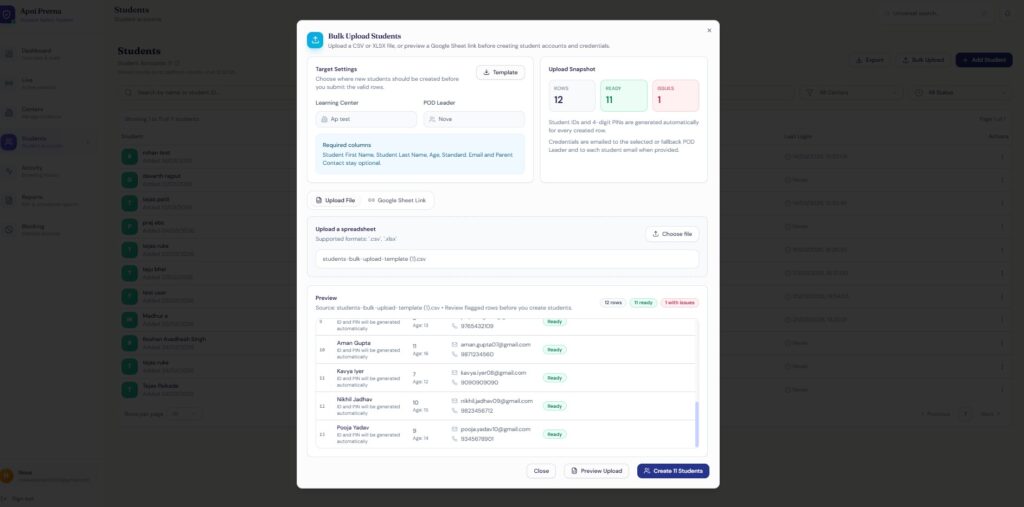
Step 4D: Upload the File

  • Click →Choose File
  • Select your Excel/CSV file
  • Click Upload

 Click Preview, upload and Create Students

After uploading the file:

  1. Click on Preview Upload
  2. Review the student data shown in the preview and click on create student

Step 4E: Credential Sharing (Bulk Upload)

  • Students receive credentials via email (if email added)
  • POD Leader may also receive details

Expected Final Output

After completing the process:

  • Student accounts are created (single or bulk)
  • Student IDs are generated automatically
  • 4-digit PIN/password is generated
  • Login details are shared via email
  • Students appear in the list with Active status

How good did it answered your questions?

Share This Article :

  • Facebook
  • X
  • LinkedIn
  • Pinterest
Still stuck? How can we help?

Still stuck? How can we help?

Updated on May 23, 2026
Deleting Unwanted ApplicationsHow to Install Apni Prerna Software on a Windows PC

Start Small.

Change Everything.

Open a POD in your area and light up young minds.

Start a POD
Talk To Us
Picture of ApniPathshala Logo Primary

ApniPathshala supports community leaders, parents, and educators in creating and running local learning centres or microschools by providing the guidance, resources, and ecosystem needed for sustainable, community-driven education.

Quick Links

  • POM (POD Operation Manual)
  • Blogs
  • About Us
  • Contact Us
  • Comics
  • Social Media
  • Terms & Conditions
  • Volunteering
  • Vacancies
  • POM (POD Operation Manual)
  • Blogs
  • About Us
  • Contact Us
  • Comics
  • Social Media
  • Terms & Conditions
  • Volunteering
  • Vacancies

Get our newsletter

2 mails every week. No spam.

Facebook Linkedin X-twitter Youtube Instagram Phone-alt Envelope

Founded by:

Dr.Aniruddha Malpani

Copyright © 2025 APNIPATHSHALA. All rights reserved.